

Symptoms
When you expand an Eager zero thick provisioned disk it changes to Lazy zero thick provisioning disk.
This issue occurs when the default Thick Provision Eager Zeroed is created the data remaining on the physical device is zeroed out when the virtual disk is created, when you expand the disk it will not zero out the blocks from the storage array this changes the eager zeroed disk to lazy zeroed thick provisioned disk.
Resolution
Zero the disk again:
vmkfstools –eagerzero /vmfs/volumes/myVMFS/VMName/disk.vmdk
—————————————————————-
Types of Virtual Disk on VMWare
VMWare uses three types of disks:
- Thick Provision Lazy Zeroed — all space of such virtual disk is allocated upon creation, while the blocks are not cleared of the data that was there earlier. When the virtual machine first accesses a new block, it is cleared. The first time a block is accessed on such a disk, I/O performance for the clear operation is lost. The VM then accessed such a data block next time, the performance is identical to Eager zeroed Thick. This type of disk is created for virtual machines that are using the VMware vSphere client by default;
- Thick Provision Eager Zeroed — all space of such disk is allocated at the time of creation, and all storage blocks are cleared of the data that was there earlier. The advantage of such disk is performance and security, the disadvantage is the long creation time;
- Thin Provision (or dynamically) — virtual disks are initially created with minimum size and grow as they fill up with data to the specified vmdk file size. When a new block is filled up with the data, it is cleared beforehand. Such disks are the least productive (need some time for allocating a new block and cleaning it), but the most optimal in terms of saving space on the storage. Thin provisioned disks allow storing more virtual machines in the same VMFS datastore.
How to Change Disk Provisioning Type using ESXI CLI?
Connect to ESXi server as root using a favorite SSH client (for example, Putty), and change directory to the vmfs/volumes:
# cd /vmfs/volumes
List the available datastores:
# ls –lh
And go to the folder, containing your VM files.
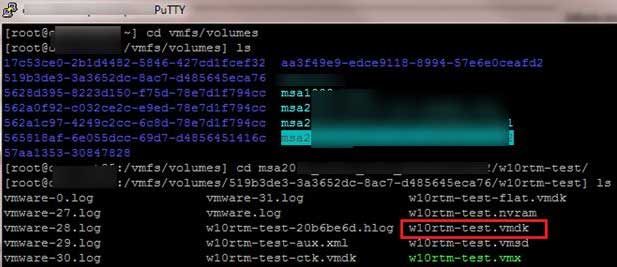
We are interested in the file w10rtm-test.vmdk. To convert this file from Thick to Thin, run the following command:
# vmkfstools -i w10rtm-test.vmdk -d thin w10rtm-test-thin.vmdk
Hint. Several examples of creating disks of a certain type from ESXi cli using the built-in vmkfstools tool:
# vmkfstools –c 40G –d thick thick.vmdk
# vmkfstools –c 40G –d zeroedthick zeroedthick.vmdk
# vmkfstools –c 40G –d eagerzeroedthick eagerzeroedthick.vmdk
After conversion completes, delete the original Thick disk file w10rtm-test.vmdk:
# rm w10rtm-test.vmdk
And rename the resulting Thin disk:
# mv w10rtm-test-thin.vmdk w10rtm-test.vmdk
Now using vSphere Client or vSphere Web client, open the VM settings and delete the old disk (Select Remove from virtual machine). After that add new disk: Add new device > Existing Hard Disk > Use an existing virtual disk > select file w10rtm-test.vmdk on your datastore > Next > Ok.